macOS
The macOS FlexxAgent allows Apple devices running this OS to be included in the Flexxible service consoles, providing support teams with complete visibility of the status, usage, and features of the organization's macOS devices.
The agent is designed to adapt to the peculiarities of the Apple ecosystem, allowing its deployment in corporate environments via automated installation processes, both in connected scenarios and offline installations.
Supported versions and architectures
FlexxAgent is compatible with the following versions and architectures of macOS:
- macOS Monterey 12 and later versions
- Supported architectures: Intel (amd64) and Apple (arm64)
Limitations
There are certain functional limitations on macOS systems:
-
Features such as Flexxible Remote Assistance, on-demand microservices execution from Workspaces, user microservices, workflows, and notification sending are not available.
-
Due to macOS's native operation, when the user locks the screen, the OS suspends background processes. As a result, the device stops reporting information to the consoles and stops receiving actions until the screen is unlocked or the session is resumed.
Download and installation
The installation of FlexxAgent on macOS is done using an installation script and a .pkg file, the latter being for offline installation (without automatic download of the installation package).
To perform the installation, click on the Download FlexxAgent button located in the Portal's sidebar.
Next:
-
Select a report group from the respective dropdown menu.
-
Download the license/configuration file (
.conf) and the installer for macOS.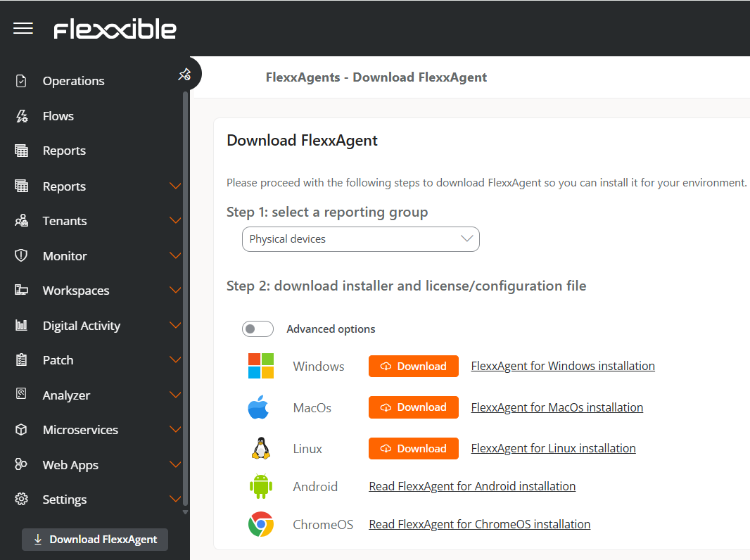
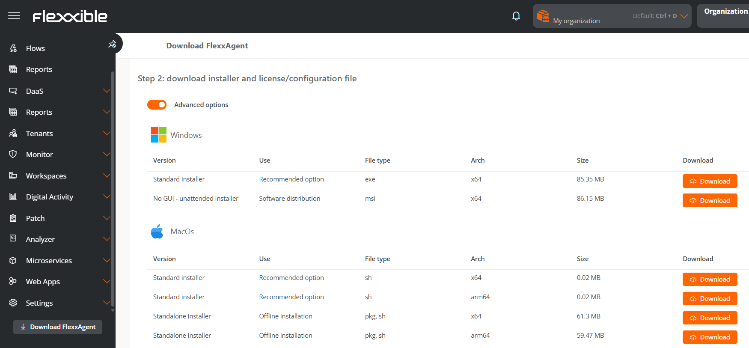
Available installer types
Advanced options allow you to select the installer type:
.sh(recommended option): standard or offline installation..pkg: offline installation.
Installation script parameters
| Parameter | Caption |
|---|---|
-v,--version <VERSION> | Use a specific version, by default, latest. |
--verbose,-Verbose | Displays diagnostic information. |
-c,--config <CONFFILE> | Applies the configuration from a configuration file by default settings.conf. |
-o, --offline | Installs FlexxAgent from a given package file, instead of downloading it. |
-?,--?,-h,--help,-Help | Shows help. |
Examples
- Install FlexxAgent with the configuration file:
flexxagent-install.sh [-c|--config <path/file.conf>]
- Install a specific version of FlexxAgent:
flexxagent-install.sh [-v|--version <VERSION>]
- Access the help:
flexxagent-install.sh -h|-?|--help
Offline installation
FlexxAgent can be installed in environments with network restrictions or no internet access.
Steps for installation:
- Place the FlexxAgent package file, the configuration file, and the installation script in the same folder.
- Allow the Terminal application to access the disk where the files are located:
- Go to
System preferences->Security and Privacy->Privacy. - Select
Full disk access. - Add the Terminal application to the list.
- Close Terminal if it was running and restart it.
- Go to the folder where the FlexxAgent files are located, and grant permissions to the script:
sudo chmod +x ./flexxagent-install.sh
- Run the script with the
-oor--offlineparameter:
sudo ./flexxagent-install.sh -c [archivo de configuración] -o [paquete de Flexxagent]
- Delete the files used if they are no longer needed.
Uninstall
The uninstall script can be downloaded from the following URL:
https://update.workspaces.flexxible.com/agents/MacOS/FlexxAgent/latest/flexxagent-uninstall.sh
Steps for uninstallation
- Download the uninstaller from the URL.
- Grant permissions to the script.
sudo chmod +x ./flexxagent-uninstall.sh - Run the script.
sudo ./flexxagent-uninstall.sh
Uninstallation script parameters
| Parameter | Caption |
|---|---|
-c,--cleanup <VERSION> | Cleans configurations and logs; default is false. |
-?,--?,-h,--help,-Help | Shows help. |
Examples
Uninstall and clean up configurations and logs:
flexxagent-uninstall.sh [-c|--cleanup]
Access the help:
sudo ./flexxagent-uninstall.sh --help
Proxy Configuration
Proxy configuration must be done before installation by modifying the configuration file downloaded from Portal.
Unauthenticated proxy
proxy = http://proxy_uri:port- Example:
proxy = http://192.168.0.100:443
Authenticated proxy
proxy = http://user:password@proxy_uri:port- Example:
proxy = http://proxy_user:xxxxxxxx@192.168.0.100:443
Update
FlexxAgent can be updated to the latest version in two ways:
- From Workspaces, select the device and perform:
Operations -> FlexxAgent -> Update to the latest version. - Re-run the installation script to download and install the latest version.
Information obtained from the device��
FlexxAgent collects data locally from the device and sends it to the service consoles.
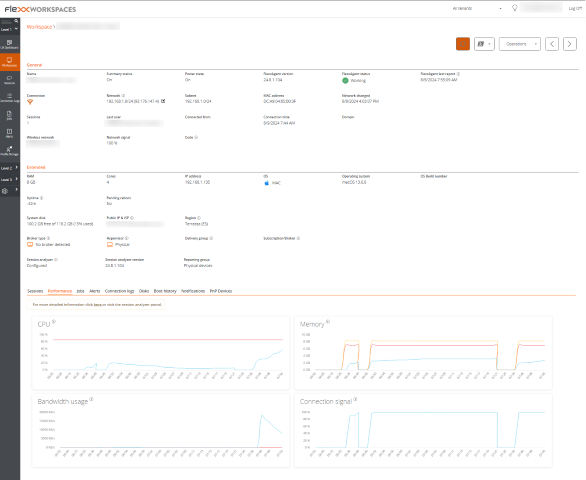
General information
- Name. Device Name.
- Device Status. Power status of the device, can be On, Off, or Not reporting.
- FlexxAgent Version. Version number of FlexxAgent installed on the device.
- FlexxAgent Status. Running or Stopped.
- Last FlexxAgent report. Date and time of the last FlexxAgent report on the device. This date might not be recent if the FlexxAgent service is stopped or the device is off.
- Connection Type. Indicates if the device is connected via Wireless LAN, Mobile Network, Ethernet, or Unknown.
- Network. Network addressing of the device and public IP for internet access. These networks are created automatically when more than four workspaces are connected to the same network.
- Network Signal. Network reception percentage.
- Subnet. Device's network addressing.
- MAC Address. Unique identifier of the device's network card.
- Wireless Network. Name of the network.
- Connection signal. Percentage of signal reception when the device connects using a wireless method.
- Network Changed. Date and time of the last network change.
- Sessions. Number of user sessions on the device.
- Last User. Last user logged into the device in domain\account format.
- Connected From. When the selected device is a VDI or similar, shows the device name from which the virtual device is accessed.
- Connection Time. Date and time when the session started.
- Code. Lets identify the device with a personal code. This code must be manually filled in individually using the Edit option in the Operations menu of the workspace details.
- Description. Allows the user to identify the device with a personal description. This field must be assigned manually and individually using the Edit option in the Operations menu of the device details.
Extended Info
- RAM. Total capacity of available RAM.
- Cores. Number of processor cores.
- IP Address. Device's IP address on the local network.
- OS. Type of operating system.
- Operating System. OS version.
- Region. Obtained using the public IP. It might not be accurate if connected to a corporate network or using a VPN.
- Session Analyzer. Indicates whether or not it's configured to launch session Analyzer in all user sessions.
- Session Analyzer version. Session Analyzer version number.
- Report Group. Reporting group to which the device belongs.
Information in tabs
FlexxAgent groups information about the following aspects of the device:
Sessions
Displays a table with the log of user sessions established on the device and timely information about the session type, connection status, or start date.
Performance
Displays graphs of the device's main performance counters, based on data collected over the last two hours. The following are included:
- CPU. Processor usage percentage.
- Memory. Amount of memory used and available.
- Bandwidth Usage. Amount of incoming and outgoing traffic.
At the top, a link grants access to the Analyzer module.
Jobs
All actions performed from the Workspaces module on one or more devices are audited in the Jobs queue. This tab allows you to check the work done for the active device.
Alert
Presents a table with the list of all active alerts on the device. When an alert is logged, a notice is displayed at the top of the page.

Connection Log
Presents a list of the connections established with the device, including each instance where a user logs in or reconnects a previously disconnected session.
The session end date is recorded only for sessions that have been disconnected or closed. While the session remains active, this field will remain empty.
Disks
Displays a list of all partitions present on the disks identified in the system, as well as statistics of their capacity and occupancy levels.
Notifications
Allows you to see if the device has any active notification. When there is one, a message is displayed at the top of the page.
Reporting groups history
Allows you to see which reporting groups the device belongs to, the date of incorporation, and if it has been assigned to the group manually or automatically.